Raspberry Piで赤外線リモコンを使う方法を解説します。
赤外線リモコンが使えるようになることで、自宅の外からエアコンを操作したり、カメラのシャッターを切ることができるようになります。
準備するもの
赤外線リモコンを送受信するために、以下のものが必要になります。
すべての部品はAmazonや、秋月電子でも購入することができます。
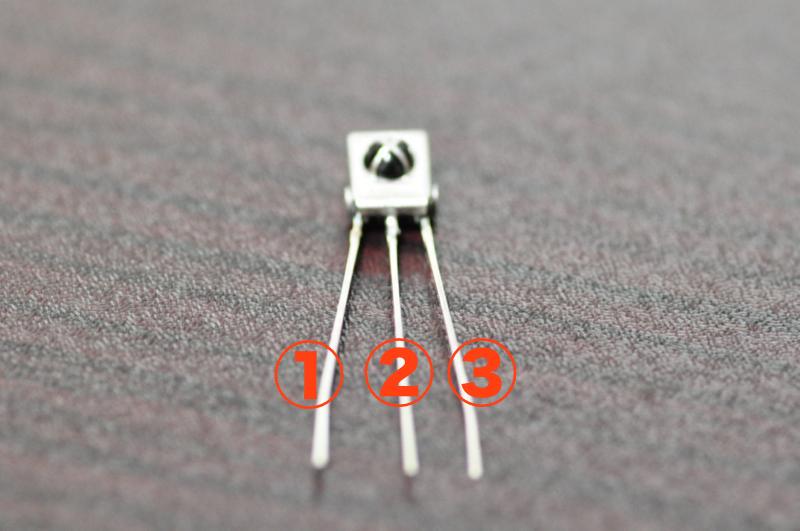
赤外線リモコン受信モジュールOSRB38C9AA
赤外線を受信するモジュールです。
5mm赤外線LED OSI5FU5111C-40
赤外線を送信するLEDです。
抵抗(1kΩ×1, 100Ω×1)
送信用LEDの信号増幅のためにトランジスタと組み合わせて使用します。
赤外線リモコンとして必要な部品は、上記だけですが、それらを接続するためのブレッドボードと、ジャンパワイヤは別に用意します。
ブレッドボード
ブレッドボード・ジャンパーワイヤ(メス-オス)
ハードウェアを接続する
Raspberry Piの22番ピンをリモコン受信用、23番ピンをリモコン送信用として使用します。
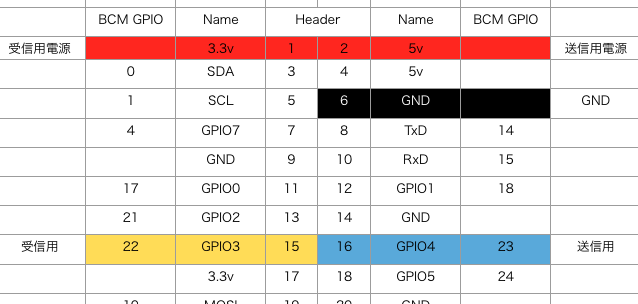
受信モジュールは電源として3.3Vを接続します。
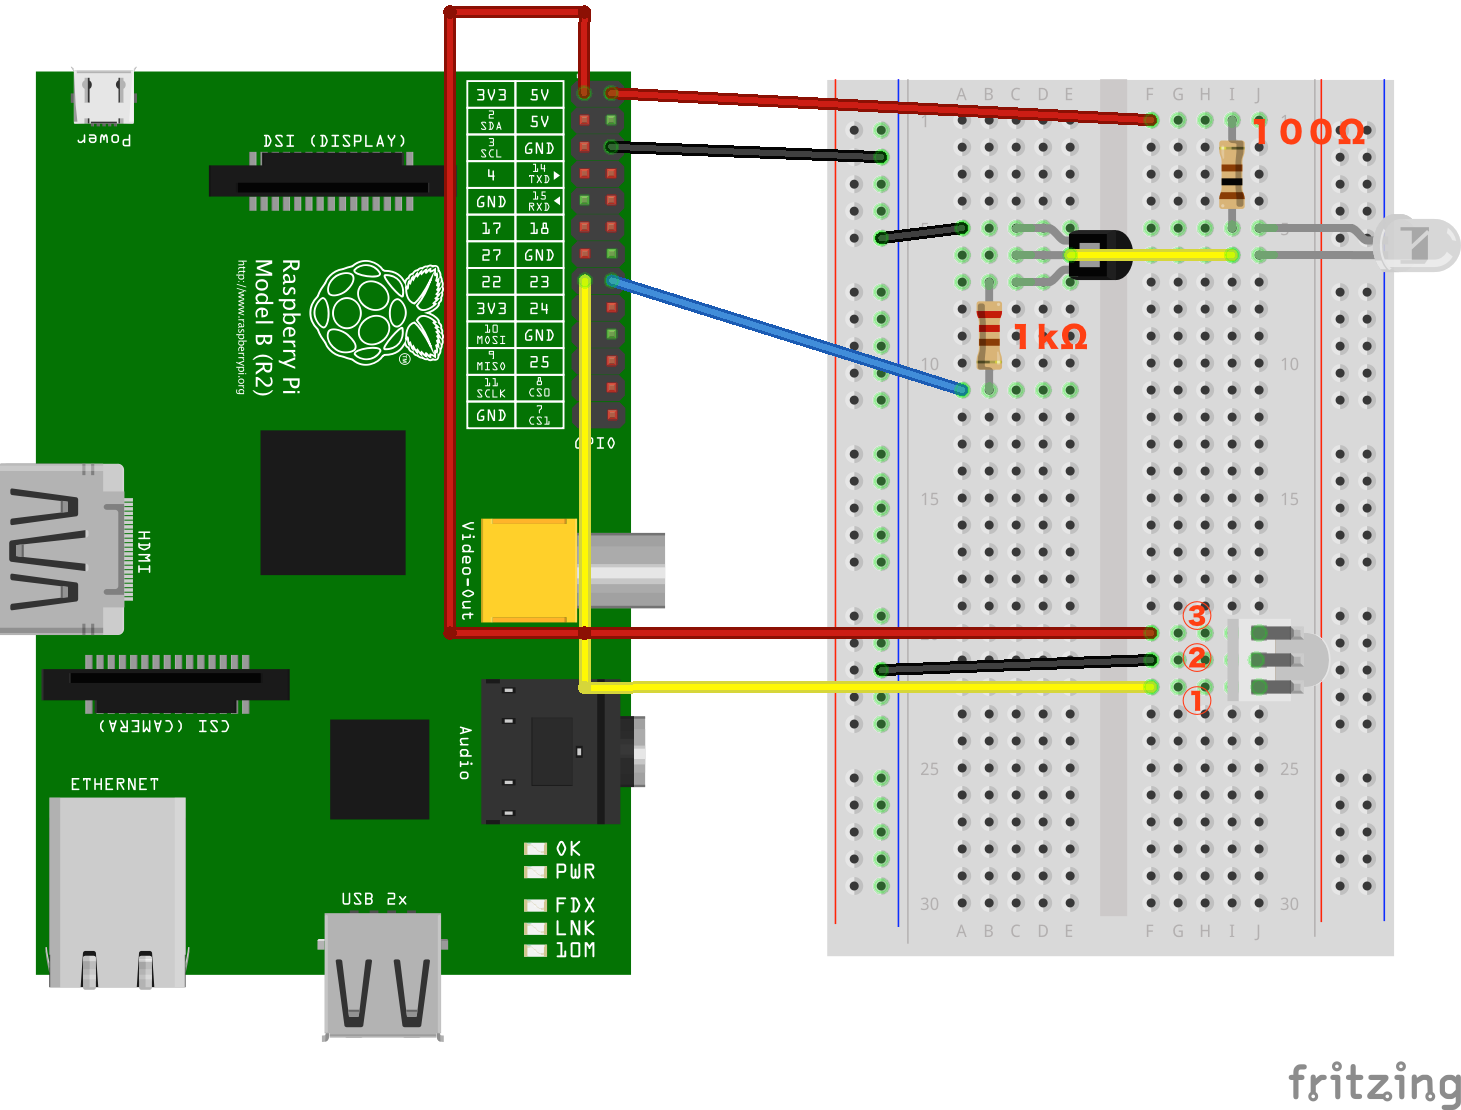
以下の図のように部品を配置・接続します。
赤外線リモコン用ソフトのインストールと設定
LIRC(Linux Infrared Remote Control)
Raspberry Piで赤外線リモコンを使うために、LIRC(Linux Infrared Remote Control)というソフトを使用します。
このソフトは、赤外線リモコンの学習し、学習した内容を赤外線リモコン出力として使用することができます。
そのため、市販の多くのリモコンをRaspberry Piで学習し、送信することができます。
インストール
Raspberry Piで赤外線リモコンを扱うために、LIRCをインストールします。
$ sudo apt-get install lirc
以降の手順は、カーネルのバージョンによって違います。
最新(Raspbian Stretch以降)の手順は①を、古い(Raspbian Stretchより前)の手順は②を参照してください。
①設定(Raspbian Stretch以降)
設定ファイルを編集します。
以下のファイルを開いて編集します。
Raspbian Stretchから、/etc/lirc/hardware.confではなく、/etc/lirc/lirc_options.confファイルを編集するようである。
[lircd]
nodaemon = False
driver = default
device = /dev/lirc0
output = /var/run/lirc/lircd
pidfile = /var/run/lirc/lircd.pid
plugindir = /usr/lib/arm-linux-gnueabihf/lirc/plugins
permission = 666
allow-simulate = No
repeat-max = 600
#effective-user =
#listen = [address:]port
#connect = host[:port]
#loglevel = 6
#uinput = ...
#release = ...
#logfile = ...
ファイル内の以下を修正する。
driver = default
device = /dev/lirc0
以下のコマンドを実行するのが手っ取り早い。
sudo sed -i -e "s/driver = devinput/driver = default/g" /etc/lirc/lirc_options.conf
sudo sed -i -e "s/device = auto/device = \/dev\/lirc0/g" /etc/lirc/lirc_options.conf
次に、LIRCのモジュールを追加します。
①LIRCのモジュールを追加(最新版:Raspbian Stretch以降)
モジュールを追加するために、以下のファイルを開きます。
$sudo vi /boot/config.txt
そして以下の行を追加します。
#RemoteController
dtoverlay=lirc-rpi
dtparam=gpio_in_pin=22
dtparam=gpio_out_pin=23
ピン番号は使用するピンに合わせて変更します。
gpio_in_pinが受信用、gpio_out_pinが送信用のピンになります。
ファイルへの保存が完了したら、再起動してモジュールを有効にします。
sudo reboot
②設定(Raspbian Stretchより前)
ハードウェア設定ファイルを編集します。
以下のファイルを開いて編集します。
$ sudo vi /etc/lirc/hardware.conf
以下のように編集します。
# /etc/lirc/hardware.conf
#
# Arguments which will be used when launching lircd
LIRCD_ARGS="--uinput"

#Don't start lircmd even if there seems to be a good config file
#START_LIRCMD=false

#Don't start irexec, even if a good config file seems to exist.
#START_IREXEC=false

#Try to load appropriate kernel modules
LOAD_MODULES=true

# Run "lircd --driver=help" for a list of supported drivers.
DRIVER="default"
# usually /dev/lirc0 is the correct setting for systems using udev
DEVICE="/dev/lirc0"
MODULES="lirc_rpi"

# Default configuration files for your hardware if any
LIRCD_CONF=""
LIRCMD_CONF=""
次に、LIRCのモジュールを追加します。
②LIRCのモジュールを追加(Raspbian Stretchより前)
モジュールを追加するために、以下のファイルを開きます。
$sudo vi /boot/config.txt
そして以下の行を追加します。
dtoverlay=lirc-rpi,gpio_in_pin=22,gpio_out_pin=23
ピン番号は使用するピンに合わせて変更します。
gpio_in_pinが受信用、gpio_out_pinが送信用のピンになります。
ファイルへの保存が完了したら、再起動してモジュールを有効にします。
sudo reboot
動作確認
再起動後、モジュールが有効になっているかを確認しましょう。
$ lsmod | grep lirc
lirc_rpi                7355  3
lirc_dev               10391  1 lirc_rpi
rc_core                17576  1 lirc_dev
RaspberryPiにデバイスとして認識されていることを確認します。
$ ls -l /dev/lirc*
crw-rw---T 1 root video 248, 0 Oct 25 22:19 /dev/lirc0
最後に、リモコンコードを受信できるかテストします。以下のコマンドを入力し、リモコンを受光モジュールに向けて押すと、受信信号が出力されます。
$ sudo /etc/init.d/lircd stop
$ sudo mode2 -d /dev/lirc0
space 2556471
pulse 1971
space 1000
pulse 5400
space 964
pulse 1542
...
コマンドを実行した時に、以下のエラーが出る場合は、LIRCのプロセスを一度停止させる必要があります。
$ sudo mode2 -d /dev/lirc0
mode2: could not open /dev/lirc0
mode2: default_init(): Device or resource busy
LIRCのプロセスを停止させるには、以下のコマンドを実行します。
$ sudo /etc/init.d/lircd stop
動作確認後、LIRCのプロセスを再び起動させておきます。
$ sudo /etc/init.d/lircd start
リモコンコードの学習
動作確認が完了したら、「irrecord」でリモコンコードを読み取り学習します。
学習結果を適当なファイルに書き出します。
ここでは、一眼レフのシャッターリモコンを学習します。
以下のコマンドを入力し、ファイル「nikon_shutter.conf」に結果を書き出します。
$ sudo irrecord -n -d /dev/lirc0 nikon_shutter.conf
コマンドを実行すると以下の表示がされるため、以下の手順でリモコン学習を行う。
- Enterキーを2回押して、リモコン学習を開始します。
- 学習したいリモコンのボタンを何度も押して学習します。複数のボタンを学習したい場合は、学習したいリモコンのボタンを何度も押してください。
ボタンを押すたびに「.」が1個表示されるため、”Please keep on pressing buttons like described above.”と表示されるまで、ボタンを押し続けます。 - “Please keep on pressing buttons like described above.”が表示されたら、10秒間待ちます。
- “Please enter the name for the next button”が表示されたら、登録したいボタン名をを入力してEnterを押します。
- 登録したいリモコンボタンを押して、登録します。
irrecord -  application for recording IR-codes for usage with lirc

Copyright (C) 1998,1999 Christoph Bartelmus(lirc@bartelmus.de)

This program will record the signals from your remote control
and create a config file for lircd.

A proper config file for lircd is maybe the most vital part of this
package, so you should invest some time to create a working config
file. Although I put a good deal of effort in this program it is often
not possible to automatically recognize all features of a remote
control. Often short-comings of the receiver hardware make it nearly
impossible. If you have problems to create a config file READ THE
DOCUMENTATION of this package, especially section "Adding new remote
controls" for how to get help.

If there already is a remote control of the same brand available at
http://www.lirc.org/remotes/ you might also want to try using such a
remote as a template. The config files already contain all
parameters of the protocol used by remotes of a certain brand and
knowing these parameters makes the job of this program much
easier. There are also template files for the most common protocols
available in the remotes/generic/ directory of the source
distribution of this package. You can use a template files by
providing the path of the file as command line parameter.

Please send the finished config files to <lirc@bartelmus.de> so that I
can make them available to others. Don't forget to put all information
that you can get about the remote control in the header of the file.

Press RETURN to continue.
<<Enterキーを押す>>
Now start pressing buttons on your remote control.

It is very important that you press many different buttons and hold them
down for approximately one second. Each button should generate at least one
dot but in no case more than ten dots of output.
Don't stop pressing buttons until two lines of dots (2x80) have been
generated.

Press RETURN now to start recording.
<<Enterキーを押す>>
<<学習したいリモコンキーを全て押す>>
................................................................................
Found gap: 10239
Please keep on pressing buttons like described above.
<<ここで10秒待つ>>
.irrecord: no data for 10 secs, aborting
Creating config file in raw mode.
Now enter the names for the buttons.

Please enter the name for the next button (press <ENTER> to finish recording)
<<任意のボタン名を入力して、Enterキーを押す(ここではshutter)>>

Now hold down button "shutter".
<<学習したいリモコンのボタンを押して確認します>>
Got it.
Signal length is 85

Please enter the name for the next button (press <ENTER> to finish recording)
<<追加で学習するボタンがない場合は、Enterキーを押して終了します>>
<<追加で学習するボタンがある場合は、名前を入力して、Enterキーを押します>>
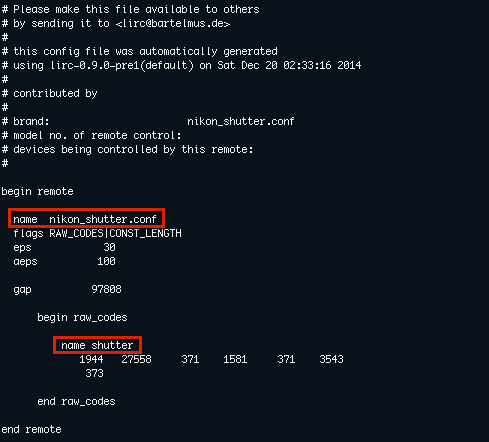
上記、コマンドを入力後、以下のようなファイルが生成されます。
begin remote

name nikon_shutter.conf
flags RAW_CODES|CONST_LENGTH
eps 30
aeps 100

gap 97792

begin raw_codes

name shutter
1975 27526 403 1543 405 3513
405

end raw_codes

end remote
このファイルを /etc/lirc/lircd.conf にコピーして、LIRCから使えるようにします。
$ sudo sh -c "cat nikon_shutter.conf > /etc/lirc/lircd.conf"
/etc/lirc/lircd.confに#UNCONFIGUREDというコメントが残っているとLIRCが動かないので注意してください。
複数のリモコンを学習した場合は、上記のコマンドで/etc/lirc/lircd.conf に設定を追加します。
LIRCの起動
起動スクリプトに登録して、起動時にLIRCが有効になるようにします。
$ sudo update-rc.d lirc defaults
$ sudo /etc/init.d/lirc start
送信する
以下のコマンドで、登録されたリモコン信号を送信します。
$ irsend SEND_ONCE nikon_shutter.conf shutter
ここで指定する「nikon_shutter.conf」や「shutter」は、設定ファイル/etc/lirc/lircd.confに登録されているリモコン名とボタン名です。
登録されているリモコンの一覧を確認するには、以下のコマンドを入力します。
$ irsend LIST "" ""
irsend: nikon_shutter.conf
irsend: cl_rn1.conf
登録されているリモコンのボタンの一覧は、以下のコマンドを入力します。
$ irsend LIST cl_rn1.conf ""
irsend: 0000000000000001 memory_on
irsend: 0000000000000002 all_on
irsend: 0000000000000003 all_off
irsend: 0000000000000004 light_up
irsend: 0000000000000005 light_down
irsend: 0000000000000006 sleep
irsend: 0000000000000007 memory_set